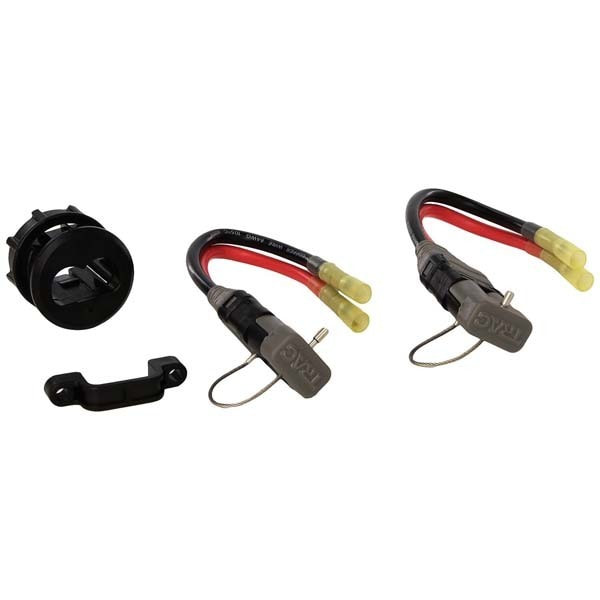
AMRT-T10136-2 * TRAC Trolling Motor Connector Kit - 2 sizes Available
SKU:
$29.69
$21.95 - $27.95
$27.95
per item
AMRT-T10136-2 * TRAC Trolling Motor Connector Kit - 2 sizes Available
Upgrade your Trolling Motor Connectors to high-current 12v or 24v power.
Kit Includes
- 2 Quick-Connect plugs (one for boat/battery and one for trolling motor or other device)
- 1-½” Round Hole Adaptor (to install boat plug in flat panel )
- U-bracket (to install boat plug on flat surface)
- Heavy AWG Marine-Grade Tin-Plated Copper Pig-tail Wires
- Heat shrink butt-splices
Gauges Available:
- 8 Gauge for 60 amp
- 12/24/36v Power
- 10 Gauge for 40 amp
- 12v or 24v Power
This product was tested by members of the North American Fishing Club with great reviews with excellent marks and ratings above 9 (on a scale of 1-10) for Quality, Performance, Design, Effectiveness and Ease of Use among other test criteria.
Image from the TRAC Trolling Motor Kit Installation Instructions
Installation Instructions
HOW TO INSTALL TRAC TROLLING MOTOR CONNECTOR KIT
Kit Includes
- 2 Quick-Connect plugs (one for boat/battery and one for trolling motor or other device)
- 1-1/2” Round Hole Adapter (to install boat plug in flat panel)
- U-Bracket (to install boat plug on flat surface)
- Heavy AWG Marine-Grade Tin-Plated Copper Pig-tail Wires
- Heat shrink butt-splice
Installation Instructions
- Choose the type of receptacle installation that is best for your application:
- The round hole adaptor can be used for installations through a flat panel.
- The U-bracket can be used to install the receptacle on the side of a flat surface. The receptacle (or plug) can also be left unattached if desired, but make sure it cannot fall into standing water and that the harness is secured.
- The battery wire and trolling motor wire can be cut to length. It is a best practice to place a loop in the wires allowing for extra wire to be available if needed. Cut the wires and strip ½” of the plastic insulation off the wire ends.
- Insert the stripped wires in the butt splice on the supplied plug making sure the wire is fully inserted in the metal part of the splice. Wires are connected black-to-black and red-to-red.
- Crimp butt splices with a crimping tool.
- To use Round Hole Adaptor
- Drill a 1.5” hole in the flat panel. On the back side of the panel place the plug through the round hole adapter nut (removed from the adaptor).
- Pass the plug through the 1.5” hole. Note: The nut must be on the back side of the panel.
- Remove the gray plug cap by unscrewing the stainless tether was removed.
- Insert the plug into the back side of the adaptor so the threaded hole is on the same side as the small screw hole. The plug will snap into the adaptor.
- Install the small screw through the adaptor and into the plug to secure it. Pass the adaptor into the 1.5” hole and thread the nut on the backside onto the adaptor. Hand tight is tight enough. Over tightening will cause the nut to skip a thread. If desired, the stainless tether with cap can be screwed onto the front of the round hole adaptor.
- To use the U-bracket
- The bracket will fit over the plug, fitting in a groove on the plug.
- Secure to a flat surface with screws provided.
- Install the accessory plug on the trolling motor (or other electrical device) wires by cutting the wires and stripping ½” of plastic insulation.
- Insert the wires in the butt splices making sure the wires are completely inserted in the metal part of the splice. Crimp splices with crimping tool. Make sure wires are connected black-to-black and red-to-red.
- The plugs are suitable for both 12v and 24v applications.
Information sourced from the Trac Trolling Motor Connector Kit Installation Instructions
- California Residents: P WARNING Cancer and Reproductive Harm - P65Warnings.ca.gov.
Sold out